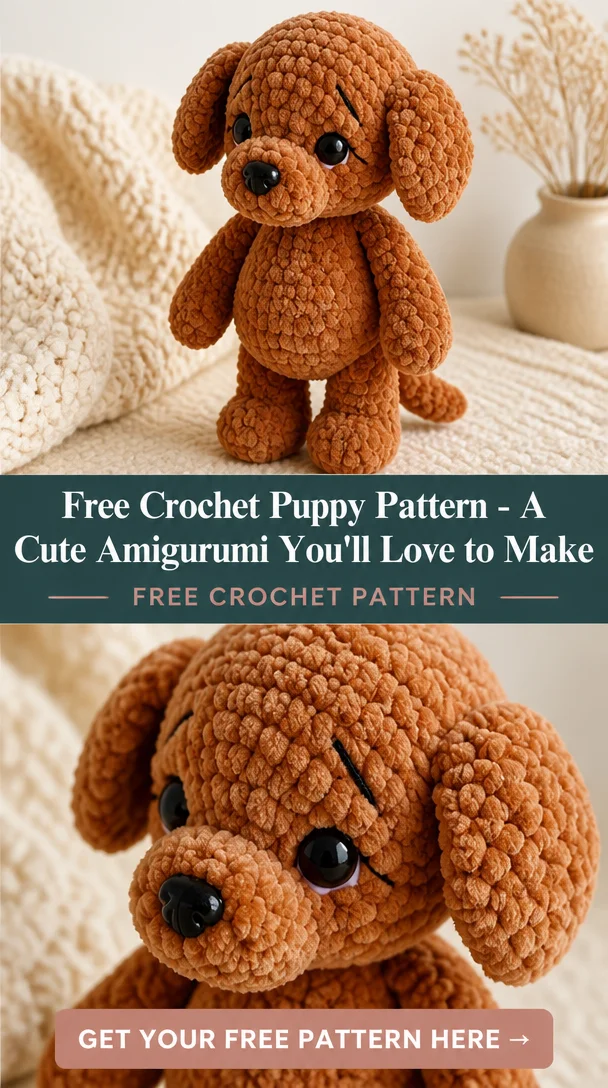
Free Pattern: Crochet Your Own Adorable Puppy! | Small crocheted teddy bear dogs free, Crochet small puppy pattern free, Small crocheted stuffed dog pattern
If you’re looking to create a special handmade gift or a delightful toy, this crochet puppy pattern is perfect for you! This adorable small crocheted puppy captures the playful essence of our furry friends in a compact and cuddly design. Whether you’re a beginner wanting to dive into amigurumi or an experienced crocheter seeking a quick project, this pattern offers a fun and rewarding challenge. The end result—a charming stuffed puppy—is a lovely addition to any toy collection, making it an ideal project for children and adults alike. Let’s get started on bringing this cute companion to life!
Crochet Puppy Pattern Overview
- Skill Level: Beginner to Intermediate
- Finished Size: Approximately 8 inches tall
- Crochet Hook: 3.5 mm (E)
- Yarn Type: Worsted weight (medium)
- Main Colors: Brown, white, and black (customizable)
- Construction Method: Worked in continuous rounds
- Approximate Time: 4-6 hours
- Project Suitability: Beginner-friendly with some basic skills
Materials You’ll Need
- Worsted weight yarn in desired colors
- 3.5 mm crochet hook
- Polyfill stuffing
- Safety eyes (optional)
- Yarn needle
- Stitch marker
- Scissors
- Embroidery thread (for facial features)
Crochet Abbreviations
- ch – chain
- sc – single crochet
- inc – increase (2 sc in one stitch)
- dec – decrease (2 sc together)
- sl st – slip stitch
- rnd – round
Before You Start
- Begin by working in continuous rounds to avoid spiral seams.
- Use a stitch marker to mark the beginning of each round.
- Check your stitch counts regularly to ensure consistency.
- Stuff your puppy gradually as you work through the pattern to achieve the right shape.
- Keep track of your rounds to maintain the desired proportions.
Free Crochet Puppy Pattern
Head
Round 1: Start with a magic loop and make 6 sc into the loop.
Round 2: Inc in each stitch around (12 sts).
Round 3: Sc in the next stitch, inc in the next stitch; repeat around (18 sts).
Round 4: Sc in the next 2 stitches, inc in the next stitch; repeat around (24 sts).
Round 5-10: Sc in each stitch around (24 sts).
Round 11: Sc in the next 2 stitches, dec; repeat around (18 sts).
Round 12: Sc in the next stitch, dec; repeat around (12 sts).
Stuff the head and close off.
Body
Round 1: Magic loop and make 6 sc into the loop.
Round 2: Inc in each stitch around (12 sts).
Round 3: Sc in the next stitch, inc; repeat around (18 sts).
Round 4-8: Sc in each stitch around (18 sts).
Round 9: Sc in the next stitch, dec; repeat around (12 sts).
Stuff the body and close off.
Ears (Make 2)
Round 1: Magic loop and make 6 sc into the loop.
Round 2: Inc in each stitch around (12 sts).
Round 3-4: Sc in each stitch around (12 sts).
Fasten off, leaving a long tail for sewing.
Legs (Make 4)
Round 1: Magic loop and make 6 sc into the loop.
Round 2: Inc in each stitch around (12 sts).
Round 3-5: Sc in each stitch around (12 sts).
Fasten off, leaving a long tail for sewing.
Tail
Round 1: Magic loop and make 4 sc into the loop.
Round 2: Sc in each stitch around (4 sts) for several rounds.
Fasten off, leaving a long tail for sewing.
Assembly
- Position the head on top of the body and sew them together securely.
- Attach the ears on either side of the head, ensuring they are symmetrical.
- Sew the legs to the bottom of the body, spaced evenly apart.
- Attach the tail at the back of the body, securing it well.
- Ensure all pieces are aligned and securely fastened.
Facial Features and Finishing Details
- Position safety eyes on the head and sew or glue them in place.
- Use embroidery thread to stitch a small nose and mouth. Feel free to customize these features to add character to your puppy!
Tips for a Better Result
- Use a fluffy yarn for a softer finish that enhances the puppy’s cuddly appearance.
- Pay attention to the stuffing; too much can make your puppy look lumpy, while too little can lead to sagging.
Customization Ideas
- Change the main colors for a different breed look—white and black for a panda dog or grey for a mellow hound.
- Add a tiny scarf or collar for added charm.
- Experiment with different yarn types for unique textures.
Common Problems and Troubleshooting
- If your puppy’s head is uneven, check for consistent stitch tension.
- To fix lumpy stuffing, remove some filling and redistribute it.
- Ensure legs are attached straight—lay it flat to check alignment before securing.
Care and Safety
Handmade crochet items should be surface cleaned to maintain their shape and integrity, especially if used as children’s toys. Safety eyes should be securely attached, as they are small parts.
Frequently Asked Questions
-
Is this crochet puppy pattern beginner-friendly?
Yes, it’s suitable for beginners with some basic crochet skills. -
What yarn is best for this crochet puppy?
Worsted weight yarn works best to achieve the desired size and structure. -
How long does it take to crochet this animal?
It typically takes around 4-6 hours depending on your skill level. -
Can I make this crochet animal larger or smaller?
Absolutely! Adjust the yarn weight and hook size for a different scale. -
Can I use different yarn colors?
Yes, feel free to personalize your puppy with any colors you like. -
How do I keep the finished animal in shape?
To maintain shape, avoid overstuffing and regularly fluff the finished animal.
Conclusion
Creating your own adorable crochet puppy is a delightful and fulfilling project that results in a lovable companion. Whether you gift it or keep it for yourself, you’ll enjoy every stitch of this charming pattern. Happy crocheting!




Leave a Reply