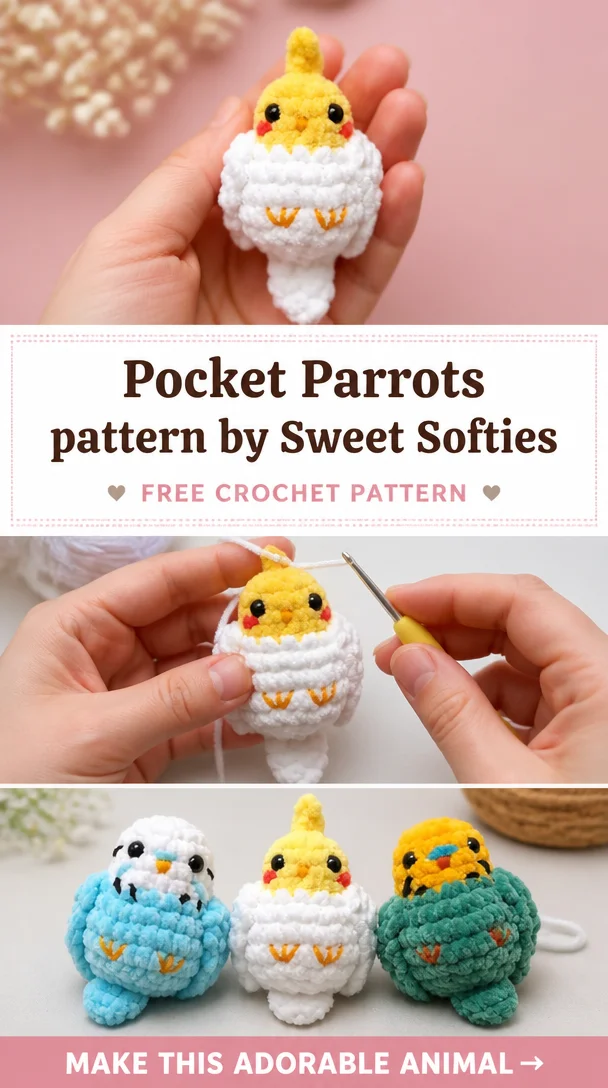
Pocket Parrots pattern by Sweet Softies
Crocheting adorable animals can be an immensely satisfying project, and the Pocket Parrots pattern by Sweet Softies brings a splash of color and charm to your crafting repertoire. These delightful miniature parrots are not only fun to create but also make wonderful gifts or vibrant décor for your home. With their cheerful appearance and unique features, Pocket Parrots are perfect for seasoned crocheters as well as beginners diving into amigurumi. Engage your creativity and enjoy the process of crafting these cute companions that are sure to brighten anyone’s day!
Crochet Pocket Parrots Pattern Overview
- Skill Level: Intermediate
- Finished Size: Approximately 5 inches tall
- Crochet Hook: 3.5 mm (E) or as needed for gauge
- Yarn Type: Worsted weight yarn (medium)
- Main Colors: A combination of yellow, green, blue, and additional colors for accents
- Construction Method: Worked in continuous rounds
- Approximate Time: 5-10 hours
- Beginner-Friendly: Not specifically, but beginners with some experience can manage
Materials You’ll Need
- Worsted weight yarn in various colors
- 3.5 mm crochet hook
- Stuffing (polyester fiberfill)
- Safety eyes (12 mm)
- Yarn needle
- Stitch marker
- Scissors
- Embroidery thread for beak and details
- Optional: Additional yarn for decorative elements
Crochet Abbreviations
- ch: chain
- sc: single crochet
- inc: increase (2 sc in the same stitch)
- dec: decrease (sc two stitches together)
Before You Start
- Remember to work in continuous rounds, especially for the body of the parrot, to avoid visible seams.
- Use a stitch marker to keep track of your rounds.
- Check your stitch counts regularly to ensure an even shape.
- Stuff the parrot gradually as you go to avoid overstuffing.
- Keep an eye on your round count to maintain symmetry for body parts.
- Prepare all assembly pieces beforehand for an easier assembly process.
Free Crochet Pocket Parrots Pattern
Head
Round 1: 6 sc in a magic ring.
Round 2: Inc in each stitch (12).
Round 3: sc in next stitch, inc in next stitch repeat around (18).
Round 4: sc in next 2 stitches, inc in next stitch repeat around (24).
Round 5: sc in next 3 stitches, inc in next stitch repeat around (30).
Round 6-8: sc in each stitch around (30).
Finish off, leaving a long tail for sewing.
Body
Round 1: 6 sc in a magic ring.
Round 2: Inc in each stitch (12).
Round 3: sc in next stitch, inc in next stitch repeat around (18).
Round 4: sc in next 2 stitches, inc in next stitch repeat around (24).
Round 5-10: sc in each stitch around (24).
Round 11: sc in next 2 stitches, dec repeat around (18).
Stuff lightly.
Round 12: sc in next stitch, dec repeat around (12).
Round 13: dec until closed.
Finish off, leaving a long tail for sewing.
Wings (Make 2)
Round 1: 6 sc in a magic ring.
Round 2: Inc in each stitch (12).
Round 3: sc in next stitch, inc in next stitch repeat around (18).
Round 4-5: sc in each stitch around (18).
Finish off, leaving a long tail for sewing.
Tail
Round 1: 6 sc in a magic ring.
Round 2-3: sc in each stitch (6).
Finish off and leave a long tail for sewing.
Assembly
- Attach the head to the body securely, placing it centered.
- Position and sew the wings on each side of the body.
- Sew the tail at the back of the body, ensuring it fans out nicely.
- Carefully embroider the beak and any additional facial features.
- Attach the safety eyes, ensuring they are secure and in place.
- Gradually fill the body with stuffing while shaping it for a rounded finish.
Facial Features and Finishing Details
For the facial features, use contrasting embroidery thread to create a simple beak and eyebrows. Position the safety eyes so that they are evenly spaced, ideally just above where the beak will be. You can also add small blush marks using blush-colored yarn to give your parrot more personality.
Tips for a Better Result
To achieve a clean finish, make sure your tension is consistent throughout the project. Don’t pull too tightly on stitches, as this can create an uneven look. Keep referencing your completed sections to ensure symmetry as you assemble various parts.
Customization Ideas
- Change yarn colors to create unique parrot species or personal favorites.
- Use different yarn textures for a more interesting look.
- Add accessories like a small hat or scarf to personalize your parrot.
- Create varying sizes by adjusting your hook size and yarn weight.
- Experiment with different facial expressions through embroidery techniques.
Common Problems and Troubleshooting
- Uneven Stuffing: Stuff the parrot gradually, molding it into shape as you go to prevent lumps.
- Loose Stitches: Check your yarn tension; adjust your hook size if necessary.
- Incorrect Stitch Counts: Refer to completed rounds frequently and count your stitches after every few rounds.
- Uneven Parts: Use stitch markers consistently to keep track of rounds.
Care and Safety
To clean your crochet parrot, gently hand wash in cold water and lay flat to dry. For safety, ensure that the safety eyes are secure, especially if the item is intended for young children. Regularly check that all components are intact and there are no small parts that could pose a choking hazard.
Frequently Asked Questions
- Is this crochet parrot pattern beginner-friendly?
The pattern is best suited for intermediate crocheters but can be tackled by determined beginners with some experience. - What yarn is best for this crochet parrot?
Worsted weight yarn is recommended for its durability and ease of use. - How long does it take to crochet this animal?
The estimated time is between 5-10 hours, depending on your skill level and speed. - Can I make this crochet animal larger or smaller?
Yes, altering the yarn weight and hook size can create a different size. - Can I use different yarn colors?
Absolutely! Feel free to customize your parrot’s colors for a unique creation. - How do I keep the finished animal in shape?
Store your parrot in a dry area and reshape lightly if needed after washing.
Conclusion
Creating your own Pocket Parrots is not just about following a pattern; it’s about bringing joy and creativity into your crafting routine. Each parrot you make can be uniquely yours, filled with personality



Leave a Reply