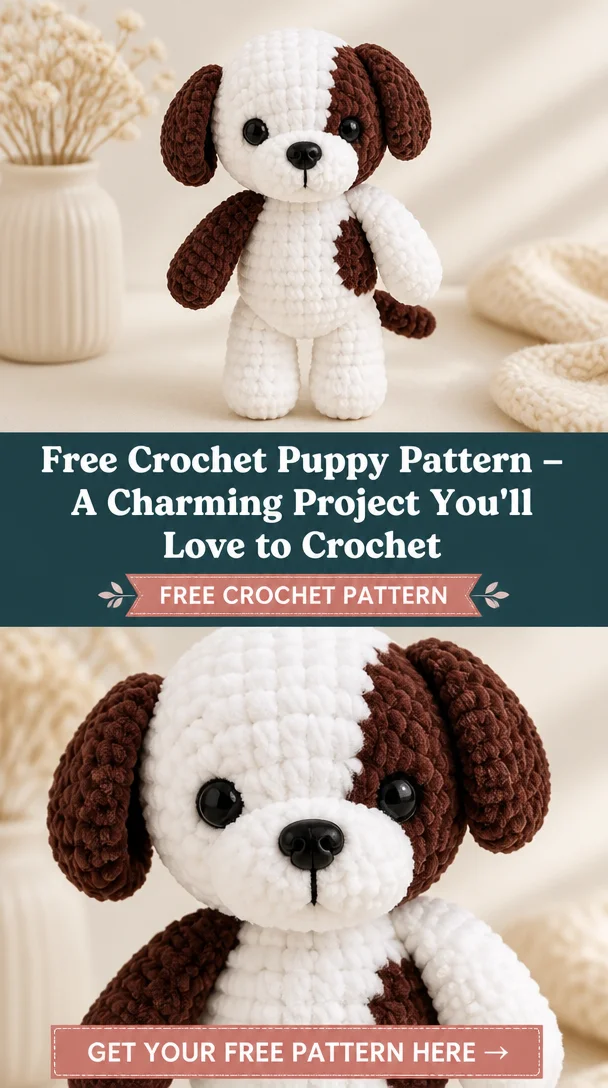
Cute Crochet Puppy Amigurumi Pattern | Easy Plush Stuffed Dog Tutorial
Create the sweetest plush puppy with this easy crochet amigurumi pattern! This adorable fluffy stuffed dog is perfect for anyone looking to make a unique handmade gift or charming nursery decor. Featuring a cozy design and crafted with soft chunky yarn, this project is not only fun but also relatively quick to complete. With step-by-step instructions covering the head, body, paws, ears, and delightful face shaping, this pattern is ideal for confident beginners and intermediate crocheters alike. Get ready to embark on a cozy crocheting adventure as you bring this cute puppy to life! 🧶🐶
Crochet Puppy Pattern Overview
- Skill Level: Confident Beginners to Intermediate
- Finished Size: Approximately 10 inches tall (varies with yarn and hook size)
- Crochet Hook: Size I (5.5 mm) or as needed for gauge
- Yarn Type: Soft chunky yarn
- Main Colors: (suggested colors: brown, white, black) – feel free to vary
- Construction Method: Worked in continuous rounds
- Approximate Time: 4-6 hours
- Beginner-Friendly: Yes, with guidance
Materials You’ll Need
- Soft chunky yarn in desired colors
- Size I (5.5 mm) crochet hook
- Stuffing (fiberfill or similar)
- Safety eyes (optional, based on preference)
- Yarn needle for sewing and weaving ends
- Stitch marker (to mark rounds)
- Scissors
- Embroidery thread (for facial features)
Crochet Abbreviations
- ch = chain
- sc = single crochet
- inc = increase (2 sc in the same stitch)
- dec = decrease (single crochet two together)
- sl st = slip stitch
- rnd = round
Before You Start
Before diving into the pattern, here are a few practical tips:
- Working in Continuous Rounds: This pattern is made using continuous rounds, so be sure not to join at the end of each round unless specified.
- Using a Stitch Marker: Use a stitch marker to keep track of your rounds.
- Check Your Stitch Counts Regularly: This will help you avoid any potential mistakes.
- Stuff Gradually: Add stuffing as you go to shape the body and head effectively.
- Keep Track of Rounds: Maintain a notepad for rounds completed and your current round to ensure accuracy.
Free Crochet Puppy Pattern
Head
Round 1: Start with a magic ring and make 6 sc in the ring.
Round 2: Inc in each stitch around (12 sc).
Round 3: Sc in next stitch, inc around (18 sc).
Round 4: Sc in next 2 stitches, inc around (24 sc).
Round 5-10: Sc in each stitch around (24 sc).
Round 11: Sc in next 2 stitches, dec around (18 sc).
Round 12: Sc in next stitch, dec around (12 sc).
Round 13: Dec around (6 sc). Fasten off and leave long tail for sewing.
Body
Round 1: Start with a magic ring and make 6 sc in the ring.
Round 2: Inc in each stitch around (12 sc).
Round 3: Sc in next stitch, inc around (18 sc).
Round 4: Sc in next 2 stitches, inc around (24 sc).
Round 5-15: Sc in each stitch around (24 sc).
Round 16: Sc in next 2 stitches, dec around (18 sc).
Round 17: Sc in next stitch, dec around (12 sc).
Add stuffing before closing. Fasten off and leave long tail for sewing.
Ears (Make 2)
Round 1: Start with a magic ring and make 6 sc in the ring.
Round 2: Inc in each stitch around (12 sc).
Round 3: Sc in next stitch, inc around (18 sc).
Round 4: Sc in each stitch around (18 sc).
Round 5: Dec in each stitch around (9 sc).
Fasten off, leaving a long tail for sewing.
Paws (Make 4)
Round 1: Start with a magic ring and make 6 sc in the ring.
Round 2: Inc in each stitch around (12 sc).
Round 3-4: Sc in each stitch around (12 sc).
Fasten off, leaving a long tail for sewing.
Assembly
- Attach the Head: Position the head on the body and sew it securely.
- Attach the Ears: Sew ears to the sides of the head, placing them slightly back.
- Attach the Paws: Sew the front paws to the bottom of the body, and back paws to the corresponding sides.
- Shape Carefully: As you attach parts, ensure they are securely stuffed and positioned correctly.
Facial Features and Finishing Details
For the puppy face, securely attach safety eyes in place, then use embroidery thread to create a small nose and a smiling mouth. Add more detailing as needed for expression. Consider using different colors for various facial features to enhance cuteness.
Tips for a Better Result
- Use a Lighter Yarn: If you want a more delicate puppy, try using lighter-weight yarn for a smaller finish.
- Experiment with Colors: Mix and match colors to keep each puppy unique.
- Securely Attach Parts: Check that parts are firmly secured so they can withstand cuddling.
Customization Ideas
- Change the puppy’s colors to create a unique look.
- Introduce stripes or spots using different color yarns.
- Add accessories such as a collar made from ribbon or tiny beads.
Common Problems and Troubleshooting
- Uneven Stuffing: Make sure to distribute stuffing evenly to prevent lumps.
- Loose Stitches: Ensure you are using the right tension for a snug finish.
- Incorrect Stitch Counts: Keep track of your rounds carefully to avoid this issue.
- Alignment Issues While Assembling: Position pieces before securing them to check alignment visually.
Care and Safety
To care for your crocheted puppy, hand wash it gently and lay it flat to dry. If safety eyes or other small parts are used, ensure they are securely attached, especially if the toy is for small children.
Frequently Asked Questions
-
Is this crochet puppy pattern beginner-friendly?
Yes, this pattern is suitable for confident beginners with clear instructions. -
What yarn is best for this crochet puppy?
Soft chunky yarn works best for a cuddly finish. -
How long does it take to crochet this animal?
It typically takes around 4-6 hours. -
Can I make this crochet animal larger or smaller?
Yes, using a different yarn weight or hook size will change the dimensions. -
Can I use different yarn colors?
Absolutely! Feel free to mix colors to create various puppy designs. -
How do I keep the finished animal in shape?
Regularly fluff the stuffing and avoid heavy washing to maintain its form.
Conclusion
This cute crochet puppy amigurumi pattern is a delightful project that’s perfect for any crocheter looking to create something charming and cuddly. With a few hours of fun stitching, you’ll have an adorable plush puppy ready to gift or decorate your nursery. Happy crocheting!




Leave a Reply