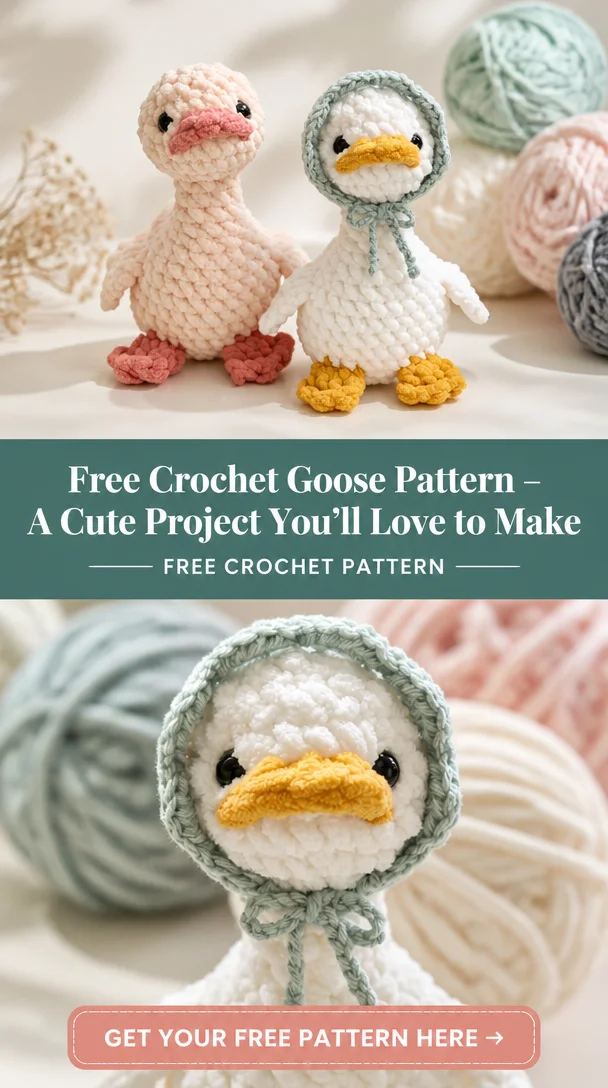
How to Make a Crochet Goose Tutorial – Hand Crafted
Crocheting a goose is an enjoyable project that brings a bit of charm into any home. This delightful amigurumi creation not only serves as a cute decorative piece but also makes for a thoughtful gift. Whether you’re an experienced crocheter or just starting, creating your own crochet goose offers a chance to explore unique stitches and techniques while working on a fun, soft animal. This pattern is perfect for all skill levels, making it an excellent choice for anyone wanting to dive into the world of crochet animals.
Crochet Goose Pattern Overview
- Skill Level: All levels
- Finished Size: Approximately 8 inches tall
- Crochet Hook: G/4.0 mm
- Yarn Type: Worsted weight yarn
- Main Colors: White and orange (or colors of your choice)
- Construction Method: Worked in continuous rounds
- Approximate Time: 4-6 hours
- Beginner-Friendly: Yes
Materials You’ll Need
- Worsted weight yarn (white for the body, orange for the beak and feet)
- G/4.0 mm crochet hook
- Polyester fiberfill stuffing
- Safety eyes (12mm)
- Yarn needle
- Stitch marker
- Scissors
- Embroidery thread (black for details)
- Optional: felt for additional facial features
Crochet Abbreviations
- CH – Chain
- SC – Single Crochet
- INC – Increase (2 SC in the same stitch)
- DEC – Decrease (single crochet two stitches together)
- RND – Round
Before You Start
- Work in continuous rounds when instructed to maintain a clean edge.
- Use a stitch marker to keep track of your rounds, moving it up each time you start a new round.
- Stuff your goose gradually to ensure it maintains its shape.
- Keep track of your stitch counts to avoid discrepancies.
- Prepare all components for easy assembly at the end of the project.
Free Crochet Goose Pattern
Head
Round 1: Begin with a magic ring, CH 1, and make 6 SC in the ring.
Round 2: INC in each stitch around (12 stitches).
Round 3: (1 SC, INC) around (18 stitches).
Round 4: (2 SC, INC) around (24 stitches).
Round 5-10: SC in each stitch around (24 stitches).
Round 11: (2 SC, DEC) around (18 stitches).
Round 12: (1 SC, DEC) around (12 stitches).
Round 13: DEC around (6 stitches).
Fasten off and leave a long tail for sewing.
Body
Round 1: Magic ring, CH 1, and make 6 SC in the ring.
Round 2: INC in each stitch around (12 stitches).
Round 3: (1 SC, INC) around (18 stitches).
Round 4: (2 SC, INC) around (24 stitches).
Round 5-12: SC in each stitch around (24 stitches).
Round 13: (2 SC, DEC) around (18 stitches).
Round 14: (1 SC, DEC) around (12 stitches).
Round 15: DEC around (6 stitches).
Fasten off, leaving a long tail for sewing.
Legs (Make 2)
Round 1: Magic ring, CH 1, and make 6 SC in the ring.
Round 2: INC in each stitch around (12 stitches).
Round 3-5: SC in each stitch around (12 stitches).
Fasten off, leaving a long tail for sewing.
Beak
Round 1: Magic ring, CH 1, and make 4 SC in the ring.
Round 2: INC in each stitch around (8 stitches).
Round 3: (1 SC, INC) around (12 stitches).
Fasten off, leaving a long tail for sewing.
Wings (Make 2)
Round 1: Magic ring, CH 1, and make 6 SC in the ring.
Round 2: INC in each stitch around (12 stitches).
Round 3: (1 SC, INC) around (18 stitches).
Round 4: SC in each stitch around (18 stitches).
Fasten off, leaving a long tail for sewing.
Assembly
- Attach the head to the body using the long tail from the head, ensuring it’s centered and secure.
- Position the legs on the bottom of the body, sewing them in place.
- Attach the wings to the sides of the body, ensuring they are symmetrical.
- Attach the beak to the front of the head, making sure it is centered.
- Position and sew on the safety eyes, adding felt or embroidery for additional facial features.
- Gradually stuff the goose and shape it as needed.
Facial Features and Finishing Details
To finish your crochet goose, embroider details such as nostrils on the beak and any extra features you prefer. Use a contrasting thread for a striking look, and ensure that everything is securely attached.
Tips for a Better Result
- When stuffing, use small amounts to avoid lumps and uneven shapes.
- Ensure your stitches are consistent to maintain a uniform appearance.
- Take your time during assembly to ensure all parts align well.
Customization Ideas
- Change the colors of the yarn to create a unique look.
- Use different yarn weights for a larger or smaller goose.
- Add accessories like a scarf or hat for added character.
- Experiment with different facial expressions by modifying the facial stitches.
Common Problems and Troubleshooting
- Uneven Stuffing: Always try to use small, even amounts of stuffing and shape as you go.
- Loose Stitches: Check your tension on the first few rounds; consider using a smaller hook if needed.
- Assembly Alignment: Before sewing, lay out parts on the body to ensure the best placement.
- Shape Problems: If any part looks lumpy, gently reshape it after stuffing.
Care and Safety
To keep your crochet goose looking its best, spot clean with a damp cloth. If the piece is more decorative than a toy, ensure small parts are securely fastened to avoid choking hazards.
Frequently Asked Questions
- Is this crochet goose pattern beginner-friendly?
Yes, this pattern is suitable for all levels. - What yarn is best for this crochet goose?
Worsted weight yarn works best for durability and texture. - How long does it take to crochet this animal?
Expect to spend about 4-6 hours on this project. - Can I make this crochet animal larger or smaller?
Yes, using different yarn weights or hook sizes allows for size variations. - Can I use different yarn colors?
Absolutely! Feel free to customize your colors as desired. - How do I keep the finished animal in shape?
Proper stuffing and careful assembly will help maintain its shape.
Conclusion
Creating your own crochet goose is a rewarding experience that results in an adorable keepsake or gift. With this detailed pattern, you can bring your crochet vision to life and enjoy the cozy charm of handmade art.