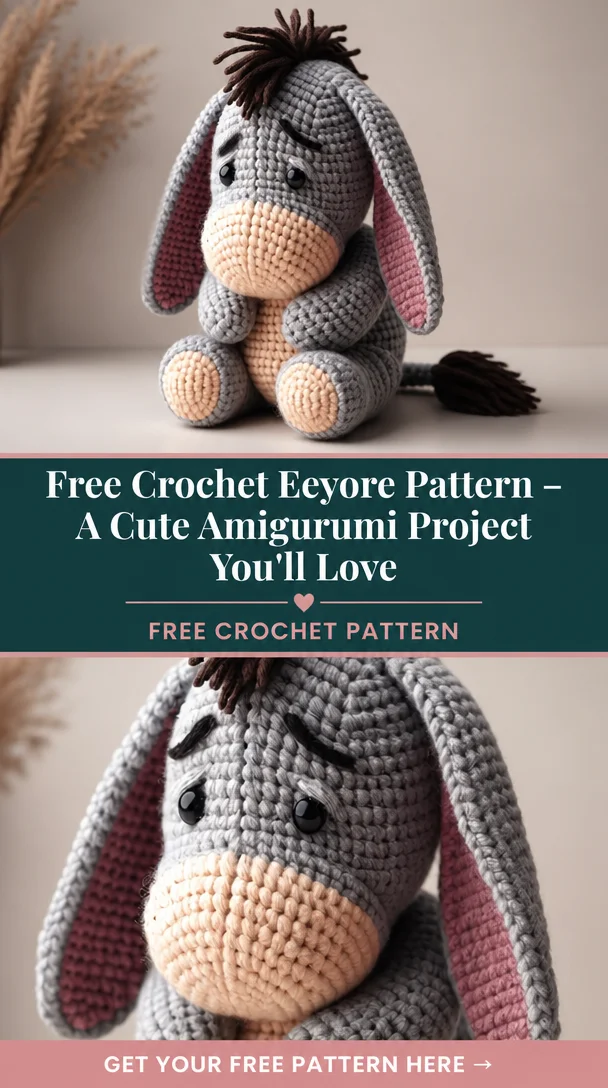
Eeyore Amigurumi – Free Pattern | Cartoon crochet patterns, Gray crochet ideas, Eyore crochet pattern free
Bring a touch of whimsy into your life with this adorable Eeyore amigurumi! This lovable character from the Hundred Acre Wood is not only cute but also perfect for anyone looking to create a charming gift for kids or an exciting project for keen crocheters. The Eeyore amigurumi pattern is fun and engaging, allowing you to explore various crochet techniques while creating a cherished keepsake or toy. This pattern is suitable for crocheters with some experience, making it a delightful step-up for those ready to tackle a more intricate project.
Crochet Eeyore Pattern Overview
- Skill Level: Intermediate
- Finished Size: Approximately 10 inches tall
- Crochet Hook: 3.5 mm (E/4)
- Yarn Type: Acrylic yarn
- Main Colors: Gray, dark gray, pink
- Construction Method: Worked in continuous rounds
- Approximate Time: 8-10 hours
- Beginner-Friendly: Not suitable for complete beginners
Materials You’ll Need
- Yarn in gray, dark gray, and pink
- 3.5 mm crochet hook
- Stuffing (fiberfill)
- Safety eyes (12 mm)
- Yarn needle
- Stitch marker
- Scissors
- Embroidery thread (black for details)
- Fabric for additional features, if desired
Crochet Abbreviations
- ch = chain
- sc = single crochet
- inc = increase
- dec = decrease
- sl st = slip stitch
- rnd = round
- st = stitch
Before You Start
- Work in continuous rounds to avoid noticeable seams unless indicated otherwise.
- Use a stitch marker to mark the beginning of each round.
- Check your stitch count regularly to maintain uniformity in pieces.
- Stuff Eeyore gradually to ensure he has a nice shape.
- Keep track of rounds to avoid confusion, especially in multi-part constructions.
- Prepare all pieces before assembly for smooth construction.
Free Crochet Eeyore Pattern
Head
Round 1: 6 sc in a magic ring.
Round 2: Inc in each st (12).
Round 3: (sc in next st, inc) repeat around (18).
Round 4: (sc in next 2 sts, inc) repeat around (24).
Round 5-9: sc in each st around (24).
Round 10: (sc in next 2 sts, dec) repeat around (18).
Round 11: (sc in next st, dec) repeat around (12).
Round 12: Dec around (6).
Body
Round 1: 6 sc in a magic ring.
Round 2: Inc in each st (12).
Round 3: (sc in next st, inc) repeat around (18).
Round 4: (sc in next 2 sts, inc) repeat around (24).
Round 5-12: sc in each st around (24).
Round 13: (sc in next 2 sts, dec) repeat around (18).
Round 14: (sc in next st, dec) repeat around (12).
Round 15: Dec around (6).
Ears (make 2)
Round 1: 6 sc in a magic ring.
Round 2: Inc in each st (12).
Round 3: (sc in next st, inc) repeat around (18).
Round 4: (sc in next 4 sts, dec) repeat around (12).
Finish, leaving long tail for sewing.
Arms (make 2)
Round 1: 6 sc in a magic ring.
Round 2-4: sc in each st around (6).
Finish, leaving long tail for sewing.
Legs (make 2)
Round 1: 6 sc in a magic ring.
Round 2-6: sc in each st around (6).
Finish, leaving long tail for sewing.
Tail
Ch 12, sc in each ch back to the start.
Fasten off, leaving long tail for attaching.
Assembly
- Stuff the head and body evenly.
- Attach the head to the body with a yarn needle by sewing securely.
- Position the ears on top of the head and sew to secure.
- Position the arms at the sides and sew them in place.
- Attach the legs to the bottom of the body.
- Stuff the tail and attach it to the back of the body.
- Shape the head and body as needed by adjusting stuffing.
Facial Features and Finishing Details
- Sew on safety eyes, positioning them evenly.
- Use black embroidery thread to create a smile and nostrils.
- Add details such as the inner ear color with pink embroidery for an extra touch.
Tips for a Better Result
- Take your time with each piece to ensure quality and symmetry.
- Experiment with different shades of gray for a unique Eeyore.
- Carefully place features to achieve an expressive look.
Customization Ideas
- Change colors to a lighter or darker palette.
- Experiment with yarn types like cotton for a different texture.
- Adjust size by using a larger hook and thicker yarn.
- Add accessories like a tiny bow or scarf.
Common Problems and Troubleshooting
- If the head looks misshaped, ensure it’s stuffed evenly and adjust as necessary.
- Loose stitches can be tightened by tightening your grip on the yarn as you work.
- Check stitch counts to prevent unevenness in height.
- Adjust assembly placement if parts look out of alignment.
Care and Safety
To clean your Eeyore, spot clean with mild detergent. As it contains small parts (safety eyes), it’s not recommended for very young children. Ensure all parts are securely attached before giving it as a toy.
Frequently Asked Questions
- Is this crochet Eeyore pattern beginner-friendly?
No, it’s better suited for those with some prior crochet experience. - What yarn is best for this crochet Eeyore?
Acrylic yarn works well, providing both softness and durability. - How long does it take to crochet this animal?
Expect to spend around 8-10 hours on completion. - Can I make this crochet animal larger or smaller?
Yes, adjusting your hook size or yarn thickness will change the size. - Can I use different yarn colors?
Absolutely! Customizing colors will make your Eeyore unique. - How do I keep the finished animal in shape?
Avoid washing in the machine; spot clean instead to maintain its form.
Conclusion
Creating your very own Eeyore amigurumi is a fulfilling project that will surely bring joy to your crafting experience. So gather your materials and get crocheting; Eeyore is waiting to come to life!




Leave a Reply